Honestly, doing this homesteading thing often leaves me to fatigued to really care much about writing. Not to mention the extra use of fuel in the snowmobiles has made gas for the generator, and battery charging a bit more of a burden. I have had to shave my dime very thin this year.
However the purpose of this post is to chronical the cutting and hauling of logs for the big cabin and the outhouse/bathhouse (primarily). Not to say that you do not exploit every available piece of wood in a given area, since firewood is always needed as well as posts for other projects such as fence material, and furniture, etc. Tis better to run a good trail through an area and use it, than have to rerun it after a big snowfall, which is not uncommon up here in the far north.
To begin with you will need your dependable snowmobile and a good sled, capable of carrying the logs to the site. A distant neighbor of mine simply spikes his log into a half cut plastic barrel and has good results, however it digs a deep channel down the middle of his trail and causes some streering and balance issues on following runs. I rather like my trails as smooth and easy to use as possible.
My immediate answer was to inlist the use of my military surplus akio. These narrow sleds work quite well, though they can be a bit tippy. To keep the weight of the log off of the ends of the akio (think of it as a very shallow oval bathtub), I lay down two 4-6" diameter logs, 4 feet long in the bottom of the akio. This lets the weight of the log rest solidly on the bottom, and once strapped down keeps bending and flexing to a minimum. I really don't want to break my akio (it is built of fiberglass). My main snowmobile is a late 90's Polaris Widetrack, with a low range transmission. These machines are great for hauling, and the low range will let you work at the slow speeds you will be traveling, without fear of burning up your belt.
Trees of the proper diameter must be located. What you determine correct is totally up to you. I decided on going with a modified, two sided log, assembled in a "piece on piece" fashion. This is simply a log cabin comprised of both vertical and horizontal logs. This allows the usage of shorter, lighter secrions of logs.
The chances of you finding a bunch of trees in one small area to build the cabin is probably not going to happen. Some scouting will be needed. I found that a tree with a 12" diameter just past the flare would give me the following:
1, 7 foot piece to be used as a building pier. This is the butt and flared section.
2, 10.5' logs to be used in wall construction.
1 16' log to be used as beam, post, or perlin logs.
Then the top material, to be used as either firewood or project material.
The first step is to cut down the tree and do as much of the limbing as possible. There will always be limbs on the bottom, buried in the snow you won't reach.
Don't be suprised that you may have to drop a tree you don't want, in order to get the tree you do want, to fall. Dealing with a snag is not what you want to deal with at this time! Also be sure to try and drop the tree in the direction it is leaning. To try and do otherwise without the proper equipment and experience can be.... interesting....
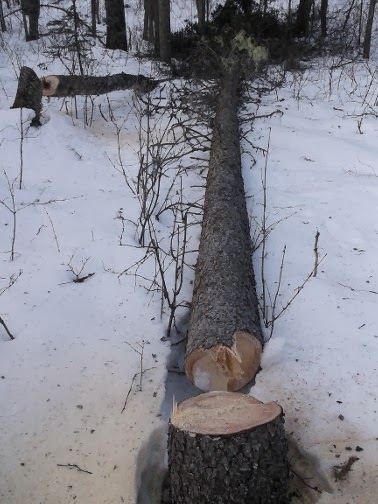
After the limbing is done and you can access the tree trunk, I take measurements, so that I can get the best use out of my tree. I measure girth and length, so I can get at leat two wall logs from each tree. In my case my wall logs are running from 12" down to 10" with the bark on.. Making them two sided logs will reduce that even further.

The much dreaded limbing process.


The marking and measuring process.
After the log is measured and marked, it is simply cut to it's proper length. After the cuts are made it is much easier to try and turn the log and remove the remaining limbs. When these logs were harvested, I was blessed with a solid snowpack, due to a warm spell, which melted the snow down, then refroze..
It is now time to haul the logs to the building site. It is at this time that I snowshoe a trail to the tree. I do this by waling a looping trail that allows me to pull up parallel to the log, load it and drive off without having to resort to using reverse. It is simply easier to load and pull away.
I secure each log onto the akio using ratchet straps. The log sits easily ontop of the two bottom logs and pulled quite easily.


Here is the loading and hauling process. A 10 to 12 foot log 12 inches in diameter, pulls with no problems, and even a much smaller snowmobile would handle this operation as log as a good trail was made first.
Honestly it isn't so much the weight as the length of the log that causes difficulty. The 16 foot logs I haul make the inevitable turns through the trees a bit harder and they tend to drag when starting up hills, etc.
So far the longest run I have had to haul a log (actual trail legth) was 1/2 mile. Much shorter if I could have just gone straight. However, terrain dictates the route.
Once you get to the building site you will want to segregate your logs in piles. Wall logs in one spot, pier logs in another, etc. And you will take up a bunch of room as you will only be able to stack the logs just so high.

This pic is the beginning of the cabin "wall log" pile. Notice how nicely it sits on top of the hard crusted snow. Since this pic was taken it and many others have become buried under about 2 feet of snow. However the hauling continues 3 day's a week. The rest consist of fire wood gathering and the hauling of the bath house logs... which are much smaller in diameter.
The log piles slowly grow.. piles of logs for wall logs, piles for posts and perlins, and piers. Other piles are for other projects, as you will be needing an outhouse, generator shed, etc...
As I've said many times... Once you start hauling.... it never stops....

To be continued........
No comments:
Post a Comment