When I first envisioned my homestead, it consisted of log structures, cut hauled a hewn from the Alaska bush. that mindset stayed with me until I met up with a friend I had met on a hunting forum, years before I moved north. My friend had been a long time Alaskan, and proved to be a wealth of practical knowledge.
Even so I resisted his advice in true male fashion, at least until I was able to fully get up to property and survey the terrain with a better eye than just a guy who flew to Alaska to buy land. The land I purchased was indeed challaging to get too. My insidious plan was working in reverse! I realized that many miles of trail would have to be built before any real homesteading could be done. Doing this with nothing more than a tent to live in suddenly wasn't as appealing as it had once been.
It was evident that I would be reconsidring my friends advice, which was actually so practical that it was no wonder I had rejected it.
The advice was this. Build a cabin/house, out of conventional lumber. While at least initially it seems counter productive, to haul all that lumber so far, lt me tell you that cutting and dragging trees across unbroken ground with minimal equipment was even more daunting. Besides fighting the trees themselves, there are mosquito's, black flies, whitesocks, devils club, and a dozen more nasties you would have to endure during the process. How did the pioneers do it?. Well, honestly, I believe that 99% of them quit in the first week. The rest either had no sense, or just could not afford to leave.
With that being said I deduced that I could haul enough lumber up to get a small "starter" cabin going in much faster time than the hard laborious work of cutting and peeling logs. And in fact it was true. While it took me the course of several months it required only a couple trips to get the lumber for the shell to my landing.
It took about a half dozen full trips from the landing to the property but all in all it was fairly quick and efficient.
The best part about the conventional cabin was that it allows you to stay at the homestead for extended periods of time comfortably. Imagine staying a summer in just a tent with bugs and bears. With the first cabin I could actually be "home".
I decided that a structure 12'x12', would allow enough room for me and two dogs to live in relative comfort for an extended period of time. I would not go smaller, as once you put in a bunk, wood stove, counter, etc, it gets small quite fast! I know a guy who put up an 8'x8' shack for the same purpose. There is barely room to turn around, while I actually have to take a few steps to get from the bunk to the kitchen sink. If you desire more room, it will be something you will need to consider on your own. Are you alone? Wife? Kids? You might want to camp out in the livingroom or some other smaller space to experiment a bit before you start.
My decision for 12x12 was partly based on utilizing full sheets of plywood and OSB, etc while trying to eliminate waste. Based on 2008 lumber prices I found that the shell for my little cabin would cost about $750. This included all 2x6's for floor joists and roof rafters, 2x4 walls. OSB exterior sheathing and 3/4" plywood for the floor.
I also had enough to run a loft across the back 4 feet of the cabin for storage purposes.
When you begin hauling your lumber you will find it very helpful to set aside enough funds to build a storage unit/toolbox out of plywood and 2x4's. I built one approximately 4'x4'x8' with a sloping lid, that I securd plastic sheeting and a tarp over, to keep the weather out. It has been a very worthwhile part of the homestead. While it is not technically bear proof, it is far better than leaving your tools under a tarp out in the woods.
You will also need a foundation for your little cabin. I decided on concrete piers with adjustable screw jacks (available at most bulding centers). These allow for leveling as the cabin settles a bit.
I built my piers using a bag of portland that I hauled up, and used sand and gravel from the creek. This saved a lot of expense and hauling. I used old plastic pails (5 gallon), cut down to a bit, as you don't want them higher than they are wide, to use as forms. I wrapped a piece of plastic around a 1" dowel, or broom handle and pushed it down 8-10" into the center of the pier to allow for the screw jack. The plastic keeps the concrete from adhering to the dowel.
Most everyone knows enough of basic constructon to build a small building so I won't go into that. I did opt for a shed style roof to keep it simple however.
I built a 3' pony wall on one side to be my high end, and I made the door fairly wide, 38" to make entry and exit of me and stuff easier.
A lot of the additional items used to build the cabin, I scrounged for. By doing a few construction cleanup jobs, I acquired much of the insulation, tin roll roofing, and additional lumber and plywood. You will be suprised how much material you can find simply by asking. You will very likely be doing a remodeling contractor favor, by hauling away the old insulation, and roofing etc.... Even windows.
Another outlet for inexpensive windows, and furnishings, etc, is the "Habitat for Humanity", re-stores. These stores sell off the donations that they deem not up to what they would use to buils a H4H home. However over the years, I have found many excellent items, including windows that where still in the plastic wrap.

In this pic you will see the framework for my little cabin. I don't even have all the rafters up, if you look closely. The structure is covered in nylon reinforced plastic (visqueen). Befind you will see the plywood storage box I built. Not visible is the moose bed just infront of where I'm standing when I took the pic.

In this photo you can see the OSB, going up on the walls. I have my lumber covered with extra tarps just in case. (Note: Something I aleadt knew, but neglected anyhow. Put your blocking in between your rafters as you are putting them up. It is just much easier)

In this pic the OSB is further along. Not the dark area's on the sheathing. This is mold from sitting outside under tarps for to long of a period of time. Tarps do not work if they are removed by wind or critters and bleach and scrubbing was required to remove.

Here you can see I have begun placing the OSB on the roof. If I had to do it over again, I would have more overhang on the ends of the cabin, before this process. It can be remedied, however it is usually easier to do before, than after the thought. When done with the sheathing I restapled the visqueen on the roof as a substitute for tar paper.
 The last of the OSB to go up was on the gable ends and above the door, as this required the most cutting of material, and the most potential for waste and mistakes. As it was I had just enough OSB to finish the job. A total coincidence on my part. Not pictured is a loft that goes across the back of the cabin (front of the pic), which serves primarily as storage but has plenty of head room for sleeping.
 Because of a lack of 2x4's the windows got put in last, and portions of the walls needed to be reframed. This really bad picture shows the installatin of the first window. the frames were all made on the spot to fit salvaged glass panes. It doesn't show well, but trust me that all cripple jack and king studs are there.
 It may be basic, but it evidentally got the seal of approval from Uljas, as he had no trouble getting acclimated. This was our moving in day. The first day when we did not have to go anyplace else to sleep. There was no stopping over at the trapper cabin to stay while the roof or walls were going up... And we have been here ever since.
 Thats right.... When we moved in we didn't even have a door. We hung up visquees and mosquito netting to keep the skeeters out. When we lwft we put up the last remaining sheet of OSB over the opening to disuade any bears from coming in. The OSB fit flush with the rest of the sheathing and there was no permanent steps, so it seemed to work well. That piece of OSB is still functioning as a door cover to this day.
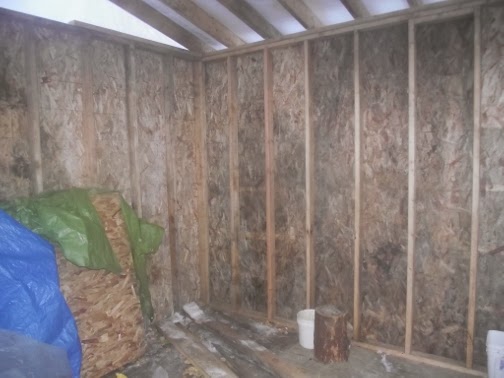
 I began putting together a crude interior. Installing insulation and building more windows. It has been in flux ever since. However this is how it looked early on.
I might add that you will want to be sure to vent your roof if you are going with a shed style arrangement as I did. Without venting you will start building up mold quite quickly and it will cause major problems. My cheapo solution was to scrounge all the cardboard boxes I could find and I stapled them up about 1.5 inches below the roof OSB. This let air flow through. I then put R-13 insulation up over the vents and then my interior plywood, which is being painted white in order to maximize my lighting potential.
My roof is aluminum roll roofing that I got off of a remodeling job and the 1/2" plywood I'm using as the interior walls was purchased used as well. I paid $75 for 24 full sheets. Other than a bit or tar paper stapled to it, the sheets were in very good condition. My door is also made of plywood and built on site.
No comments:
Post a Comment