You have chosen your woodstove, and you want to install it. May I recommend that you put the chimney going straight up from the stove through the roof. Preferably near the peak. The reason for this is that it will help minimize any leaking that may occur due to melting snow load.
This is just a personal thing, but I find it to be a good idea.
A chimney liner should be used at the roof of course. Asbestos lined ones are available for a whole bunch of dollars. Remember.... you are homesteading on a dime. My solution was to run my 6" pipe through an 8" pipe and line the larger with fiberglass insulation. I made spacers out of tin, to hold the liner in place on the smaller pipe, and it has worked very well. A chinese hat should be placed on top of the chimney. I have a friend who likes to use a T instead, with the T facing into the prevailing wind. He claims it is nearly fool proof and I believe it. I wish I had thought of it!
As with all northern homesteaders the top of your stove is too important to just let sit unused. By placing a rack (in the event you have a barrel or round top stove) on top you can utilize the heat rising to heat water, simmer coffee, and even cook your food. Stock pots and water bath canners will be an important item in your homestead.

In the photo above you can see the mounting brackets for the steel rack on top of my stove. Utilizing my woodstove to it's fullest has saved me immesnsly on propane, which I use sparingly.
The fuel you use for your wood stove will depend on your latitude. Since I am primarily a northern type of guy and have lived most of my life north of Minneapolis I am familiar with three main tree species. There are more of course, but these where what we used the most of.
Oak: the mighty oak was the real heat maker. Lesser wood was used for getting the fire going. once everything was hot you could rest assured that seasoned oak would burn the hottest for the longest.
Birch: In Minnesota we used this to get the fire going good, then would switch to oak if we had it. The bark of the birch is nearly waterproof and lites easily. The bad news about birch (there always is), is that it prodces a lot of creosote. Especially when green. So care must be taken in burning it. I'll get more into that at some point in the future.
Spruce: The most forgiving of firewood? It lights and burns beautifully when seasoned. Seasons quickly... and is very light to carry. The only down side is that it burns rather quickly. An iron stove will off set this, but if you are running a barrel stove you will be going to the stove more often. Note: with a barrel stove you will want to try not to burn through the stove?... Just a thought, as it can happen.... Red glowing barrel stoves are NOT a good idea.
Up here in Alaska I have primarily two types of wood. Birch, and spruce. I burn mostly spruce as I find more of it ready to burn. Why this is I do not know. However much of the down birch I run into is too far gone. You would think, with it's waterproof skin it would be more impervious to the elements, but it is not. Therefore I only cut up birch that is still rather green. Spruce seasons faster, and I find a lot of it lying down or slightly hung up. (I do cut down snags... I have a technique for this that is quite reliable).
Up here in Alaska, my primary available wood is birch and spruce. Since birch is my only real hardwood it has become my oak. I use it for the prolonged heat after I get a good fire going. I must admit though, to having a great liking for the white spruce that grows here. I find it in clusters of down tree's all over the place. Just a few quick cuts will let me know what condition the wood is in. Even the saw dust will give a good indication. A reddish sawdust means that the wood is getting punky, and if you are going to use it, you should do so first. What you want is a nice light colored sawdust. You will also quickly learn to gage spruces' dryness by the weight. When finding a down tree, if it has any green needles, on it at all, it will to wet to make decent firewood. That does not mean you should not cut it however. You will be needing wood next year, and by splitting it and stacking it, you will speed up the seasoning process. If the spruce is too punky, it won't split worth a darn, and it will burn with little heat. You can use it however in a situation such as tanning leather or smoking meat where you will want lots of smoke and little fire.
Birch is much heavier than spruce, even when seasoned. I don't cut much spruce unless it is very green. I will haul it, split and stack it, and make sure it is out of the weather. If done so, it makes beautiful firewood once properly seasoned.

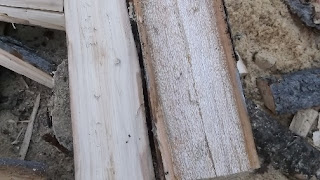
The photo above shows two pieces of white spruce. The chunk on the left is a perfectly seasoned piece of wood which will catch fire easily and burn well. The piece on the right has started to get punky, and is slightly beyond prime (notice the white specks thoughout). It will still burn fairly well, and I do keep wood like this as long as it splits well. However if you find that your axe breaks out the side of the chunk of wood while splitting, it is just a bit to far gone. This is my opinion of course, however I get no joy out of chilly cabins, nor continually fighting my wood stove to keep a fire going.
You will become very adept at choosing wood, quickly, that works best for your needs and you simply will not waste your time with substandard wood.
By choosing proper fire wood you will get your fires to start without work. They will simply start themselves with little more than the touch of a match.
My process for getting a fire going is simple, and foolproof (as long as the wood is seasoned).
I begin by placing two larger pieces of firewood in the wood stove approximately 4-4" apart. Between these pieces I place 4-5 pieces of dry birch bark. Over these I place 5-6 pieces of kindling. Simply putting a match to the birch bark will get things rolling quickly. Birch bark loves to burn hot with a nice flame, and rarely do I need to coax anything more out of it. I simply listen for the sound of the wood popping. After 10 minutes or so I check the flame and add more wood as I see fit, without smothering the air flow. I can bring my little cabin up to a nice comfortably wasrm temp in less than 20 minutes. Indeed when I awake in the middle of the night, to just a few embers left, I can simply set more spruce on top, and within a few minutes I can hear the "woosh", of the fire taking off.... No fuss, no muss...
No comments:
Post a Comment